
Slow and Steady Gets the Rep
If you were to ask someone I’ve trained in the past, I would argue that the most common phrase they heard me say is “keep your back neutral, and your core tight.” In fact, I said it so often they would begin to finish the sentence for me. However, what was perhaps being perceived as me being annoying, was actually successful priming of that individual into always abiding by that “mantra.” These principles along with a few others I will go into will be essential in protecting your body, as well as optimizing your ability to push yourself to new limits safely.
In this post we are going to discuss what exactly I mean by a neutral spine, how to brace your core, “shoulder-packing,” and the importance of stability through every exercise. It is also critical to be able to realize when to stop an exercise, and when pain plays a role in all of this. These fundamentals can be applied in activities in and out of the gym. After all, our goal is to not only be strong and healthy in the gym, but also outside of the gym. You must take the proper steps to ensure longevity and a painless future. So, let’s begin with the first rule.
A Neutral Spine
Why is this important?
Practically every exercise you do, will incorporate this concept along with the practice of bracing your core. Imagine a tall communication tower anchored by steel cables, only that your spine is the tower, and the “cables” are your abdominal and spinal muscles down your back. These muscles are responsible for keeping your spine stable, and within its normal anatomic limits. When doing an exercise, it is always important to always maintain your posture in a controlled manner. The risk of injury increases exponentially the more you deviate from your body’s natural anatomic structure.


Just look how many small muscles are responsible for every movement in your back. It’s no wonder why it’s easy to injure your back if you are not careful.
Spinal Anatomy
So, in order to discuss what a “neutral spine” is, we must first talk about the vertebral column, or what many of us know as our spine. Our spine is composed of 24 bones, or vertebrae, that protect our spinal cord.
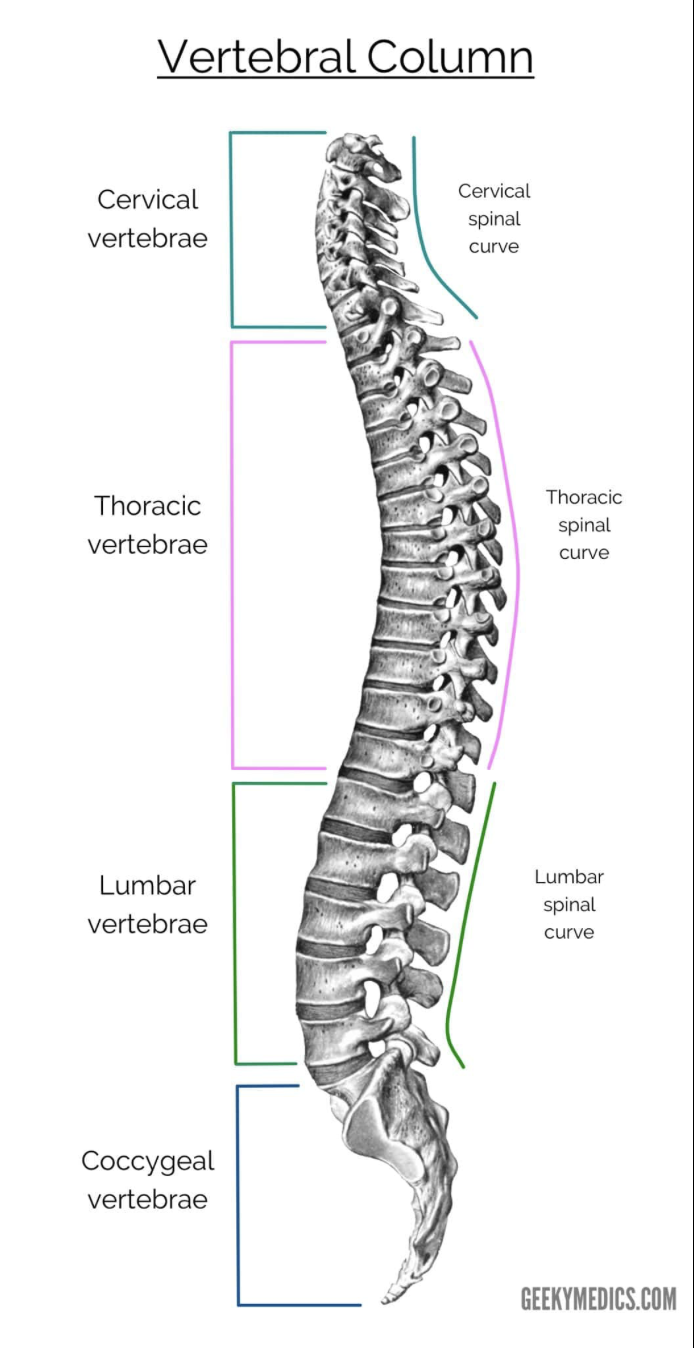
In between each of the vertebrae is what we call the “intervertebral disc,” which is what offers a cushion between our bones. As we age this begins to degrade and becomes a major cause of age-related back pain. Each disc is composed of the nucleus pulposus (inner component) and the annulus fibrosus (outer component).

The nucleus pulposus is the gelatinous portion of the intervertebral disc and is composed of 66-86% water, with the rest being collagen. Meanwhile, the annulus fibrosus is mainly composed of highly dense collagen fibers. These two structures together are responsible for transmitting stress and weight from vertebrae to vertebrae. They function exceptionally well to protect your spine unless you begin to push them past normal anatomic limits while also putting them under heavy stress via weights and lifting. Your spine is at its strongest when it is in a balanced position and all the muscles surrounding it can exert equivocal forces. Like the tower above, or the bridge you cross, the amount of weight and stress must be distributed across the spine equally to maximize strength and safety. This is what is called a “neutral spine.”
Spinal Injuries
When you are at the gym, or carrying out basic tasks throughout the day your spine is constantly exposed to a variety of movements. As these movements occur your muscles are continuously adjusting and transferring forces throughout the column. The main movements involve spinal flexion, extension, lateral flexion, and rotation. Injuries occur when any of these movements are done in excess and in an uncontrolled manner. When I add the word “hyper” to any of those movements I am simply saying that they are beyond normal anatomic limits. So the term “hyperextension” means that you are extending past the normal anatomical limits.


It is precisely at the moment where one of the muscles or structures are exposed to “excess” or “abnormal” force that an injury occurs. This can result in a “sprain,” where one of the ligaments are injured, a “sprain,” where one of the tendons/muscles are injured, or a more serious injury such as herniated disc where the nucleus pulposus “herniates” out of its normal compartment and compresses a nerve.

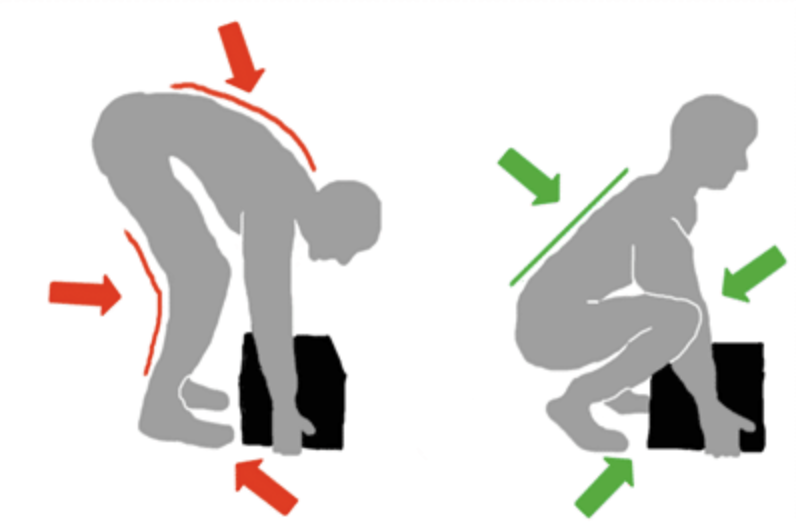
The most common way that this occurs is when your intervertebral disk is loaded in an unbalanced fashion. This occurs in most people when they are in spinal flexion. Think any movement where you go and pick anything up, light or small, and especially any weight in the gym. When you flex downward, the space between your vertebrae expands and begins to exert more force on one aspect of the intervertebral disc than the other. If this force continues it will eventually overload the disc and result in a rupture similar to that of popping a pimple, shown below.

Coreadvantage.com.au
Therefore, it is of the upmost importance to maintain your spine in a neutral position. This will keep the strength, safety, and overall integrity of the spinal column high. So, let’s talk about how to properly maintain a neutral spine when performing a lift and how it should look like.
Positioning yourself for success
Whether it is a squat, deadlift, or other activity requiring stability of your back, you will want to get into a position that feels natural and comfortable.
1. Start by standing with your feet shoulder-width apart and your back straight.
2. Engage your core muscles to stabilize your spine (if you are unsure of what that means scroll down a little to grasp that concept)
3. Keep your head in line with your spine, avoiding tilting it up or down.
4. Ensure your shoulders are relaxed and pulled back slightly.
5. Maintain a slight natural arch in your lower back, neither overly arched nor rounded.
6. Throughout the lift, focus on keeping your spine in this neutral position, avoiding excessive twisting, or bending. Take is slow.
7. If you’re performing a squat or deadlift, like a door hinge, hinge at your hips while keeping your spine straight.
8. Consider the use of a mirror or have a spotter check your form to ensure you are maintaining that neutral spine throughout the lift.
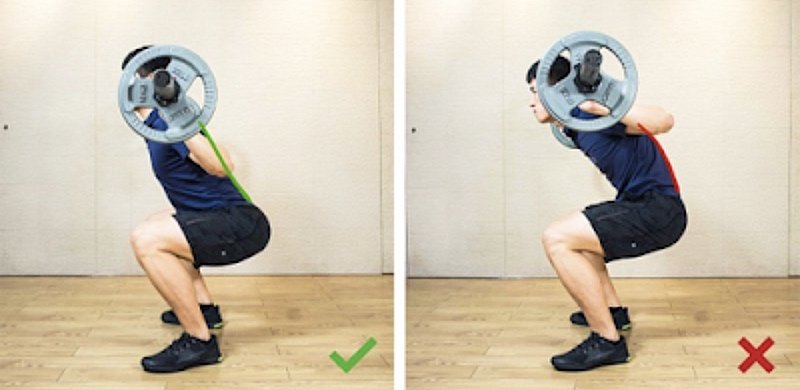
Your spine should not have any hyperextension in the lower back, and there should be no flexion when leaning forward. After all, a neutral spine is one that maintains its natural curvature. No more or no less. This will allow for optimal dispersion of forces throughout your back and protect you from injury. The reason why I call this a fundamental component of good form is because it is involved in every lift and movement. You must remain conscious of when you are putting your spine under tension and prepare for any lift mentally and physically. Eventually, it will become second nature. To help visualize what this should and should not look like I have put some examples below.


Inspireusafoundation.org
Insyncphysio.com

Practicing proper form and gradually increasing weights will help reinforce the habit of maintaining a neutral spine during lifts, promoting safety and effectiveness.
Bracing your Core
The practice of bracing your core, similar to maintaining a neutral spine is that it is essential in every exercise/activity, in and out of the gym. In the previous section I taught you about the muscles and structural components of your vertebral column, along with how to protect them. A major player in doing this, is the use of your abdominal muscles. After all, your abdominal muscles surround your entire core like a belt. They are insanely critical in the stability of your spine. Practicing this is also a great way to get an ab workout in every exercise since, if you are bracing your core, the abdominal muscles are being used consistently.
So, when I tell someone to “brace your core,” I am essentially telling them to contract those abdominal muscles as if they are ready to take a punch. It is a way of saying stabilize all of the muscles around your spine to keep it stable and protected throughout the lift. It’s the same concept behind a “lifting belt” that has grown popular recently. You essentially place a belt around your core, and push against it to stabilize your spine.
What I am about to say next may be controversial, but you DO NOT need the belt. It’s basically an ego chase where it allows you to lift another 30-50 pounds more by artificially stabilizing your core and spine. Instead, just drop the weight, practice good form, and build up your abdominal muscles naturally to withstand the weight safely. My sentiment, along with every other trainer I’ve worked with is that if you cannot lift the weight without the belt…you can’t lift the weight. The use of a belt should come into play when you are lifting supraphysiologic weight for powerlifting, and even then, you should first develop your core naturally before augmenting it with a belt. You may still develop your core using a belt, but you will hinder the process.
How to brace your core?
1. Stand tall with your feet shoulder-width apart.
2. Take a deep breath into your diaphragm, expanding your abdomen.
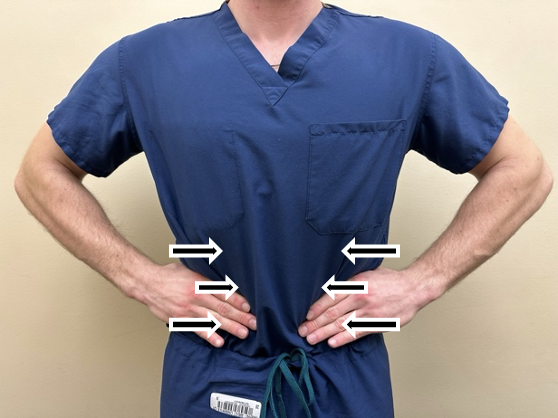
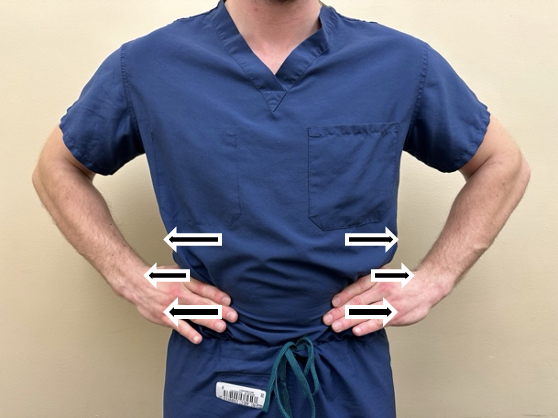
3. As you exhale, contract your abdominal muscles as if you are ready to take a punch. It may help to put your hands on your waist and feel your abdominal contraction push your hands away as seen below. I wrote this right after a shift so excuse the scrubs.
4. Maintain the tension throughout the lift, keeping the core tight and stable.
5. Focus on breathing steadily and maintaining the brace as you perform the lift.
6. Release the tension once the lift is complete and repeat the process for each repetition.
Learning this practice, along with the practice of a neutral spine will increase the stability of your spine immensely. This will lead to an increased ability to push greater weight, with better stability and a better overall safety profile.
“Shoulder Packing”
I feel like at this point you should be getting a pretty good idea of why these topics are important with the answer mainly being stability, protection, and maximal strength output. However, you’re probably wondering what shoulder packing is. To first understand this let me give you a brief summary of the shoulder.
Your shoulder is a ball and socket joint, similar to that of your femur and hip. Whenever you press a weight overhead or in front of you, force eventually gets transmitted to your shoulders. Your shoulders have a cartilage called the labrum and it is responsible for cushioning against stresses exerted upon the joint, and increasing stability. The culmination of the muscles and tendons within your shoulder joint is called the “rotator cuff.” Injuries can occur when you begin to stretch those tendons and muscles while under significant stress. You want to limit unnecessary movement within a joint when performing any major or heavy lift. Increased potential for movement during a lift equals increased risk of injury. So how do we decrease that risk? Shoulder packing.
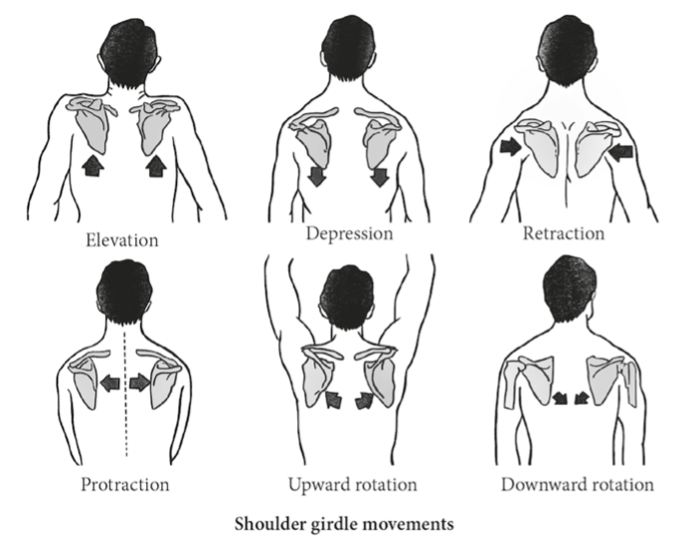
“Shoulder packing,” refers to the technique of retracting or “pulling back” your shoulders, as well as depressing the shoulder blades to create stability and support during various exercises. In case you may have a hard time visualizing those movements here is diagram showing them.
We’ve spoken about a neutral spine and bracing your core which should always be emphasized in a lift. However, this technique tends to focus more on the upper body. By pulling the shoulder blades down and back towards the spine, you engage the muscles around the shoulders and upper back, providing a strong foundation for lifting. It is an excellent technique to be used with any presses such as overhead press, dumbbell press, and/or bench press. It is also fantastic for rows, pull-ups, and any other exercise exerting stress on the shoulders.
So what are the steps for shoulder packing?
1. If you are standing, begin by having your feet shoulder-width apart and your back straight, if you are not doing a standing exercise start at step 2.
2. Engage your core muscles to stabilize your spine.
3. Roll your shoulders back and down, bringing your shoulder blades together and downward. Imagine tucking your shoulder blades into your back pockets.
4. Keep your chest up and open, avoiding rounding your shoulders forward.
5. Maintain this packed shoulder position throughout the lift, whether it is a bench press, overhead press, or row.
6. Focus on squeezing your shoulder blades together and down to create tension and stability.
7. Be mindful not to shrug your shoulders up towards your ears during the lift.
Practicing proper shoulder packing technique will help improve your lifting form, reduce the risk of injury, and maximize the effectiveness of the exercise. Now, on to the last and probably the most important topic.
Listen to Your Body, Respect the Pain
I’m sure many of us have heard the saying, “No pain, no gain.” The fact that it rhymes is honestly the only true thing about that statement. Soreness and achiness in muscles after recent strenuous activity is to be expected. However, pain that is sharp, and/or continues to occur while performing your lifts is never normal. It is a sign that you need to back off from that exercise or revisit your form practices to ensure you are not straining a specific body part more than intended.
If you are a beginner, chances are that the first few weeks will be brutal in that the day following your exercise you will be in pain. That is the result of your muscles not being exposed to that level of exercise. Over time, the soreness from exercise will diminish unless you push even harder. That kind of “pain,” although not always present, is part of the process and it should often subside after 48-72 hours. It should also improve the more you stretch and move those muscles. Here are some warning signs to watch out for in the case of a more serious injury.
Sharp or stabbing pain during or immediately after lifting.
Dull, achy pain in the muscles or joints involved in the lift that does not go away with stretching and movement.
Pain that worsens with movement of specific actions related to the lift.
Tingling, numbness, or weakness in the limbs or joints, indicating potential nerve compression injury.
Swelling, bruising, or redness around the affected area.
Limited range of motion or difficulty moving the affected body part
Persistent discomfort that lasts beyond the normal post-exercise soreness (48-72 hours)
The overarching theme in all the topics that we discussed is the importance of stability through every lift and movement. Remember, keep your spine in its neutral position. Brace your core to further stabilize your spine and surrounding musculature. And “pack” your shoulders to stabilize your rotator cuffs. You’ll be lifting safer, stronger, and more effectively before you know it. As always, if you have any questions just send a message.